
반응형
이번에는 모니터링을 추가하는 방법에 대해 알아보도록 하려고 한다.
1. pom.xml 을 추가해준다.
        <!--Actuator-->
        <dependency>
            <groupId>org.springframework.boot</groupId>
            <artifactId>spring-boot-starter-actuator</artifactId>
<!--            <version>2.6.3</version>-->
</dependency>추가 후 서버를 재기동 해주면 여러가지 요소들을 확인할 수 있다.
1-1. 아마 스프링 부트 2.6.2 버전 이후를 사용한다면 오류가 발생할 것이다.
spring.mvc.pathmatch.matching-strategy의 값이 ant_path_matcher 에서 path_patter_parser로 변경되었기 때문!
수정사항이 두가지가 있다.
[ 1. application.yml 파일 수정 ]
spring:
  messages:
    basename: messages
  mvc:
    pathmatch:
      matching-strategy: ant_path_matcher
management:
  endpoints:
    web:
      exposure:
include: "*"[ 2. SwaggerConfig 파일 수정 ]
@Bean
public WebMvcEndpointHandlerMapping webEndpointServletHandlerMapping(WebEndpointsSupplier webEndpointsSupplier,
                                                                     ServletEndpointsSupplier servletEndpointsSupplier,
                                                                     ControllerEndpointsSupplier controllerEndpointsSupplier,
                                                                     EndpointMediaTypes endpointMediaTypes,
                                                                     CorsEndpointProperties corsProperties,
                                                                     WebEndpointProperties webEndpointProperties,
                                                                     Environment environment) {
    List<ExposableEndpoint<?>> allEndpoints = new ArrayList();
    Collection<ExposableWebEndpoint> webEndpoints = webEndpointsSupplier.getEndpoints();
    allEndpoints.addAll(webEndpoints);
    allEndpoints.addAll(servletEndpointsSupplier.getEndpoints());
    allEndpoints.addAll(controllerEndpointsSupplier.getEndpoints());
    String basePath = webEndpointProperties.getBasePath();
    EndpointMapping endpointMapping = new EndpointMapping(basePath);
    boolean shouldRegisterLinksMapping = this.shouldRegisterLinksMapping(webEndpointProperties, environment, basePath);
    return new WebMvcEndpointHandlerMapping(endpointMapping, webEndpoints, endpointMediaTypes, corsProperties.toCorsConfiguration(),
            new EndpointLinksResolver(allEndpoints, basePath), shouldRegisterLinksMapping, null);
}


private boolean shouldRegisterLinksMapping(WebEndpointProperties webEndpointProperties, Environment environment, String basePath) {
    return webEndpointProperties.getDiscovery().isEnabled() && (StringUtils.hasText(basePath)
            || ManagementPortType.get(environment).equals(ManagementPortType.DIFFERENT));
}이렇게 수정해주고 서버를 재기동해주면 정상적으로 작동한다.
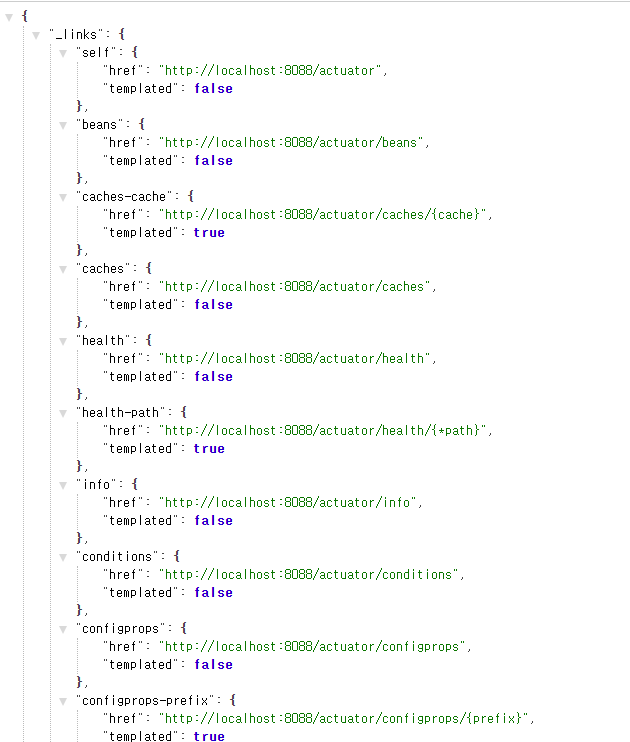
2. 웹 브라우저로 확인해보기
localhost:8088/actuator 로 확인해볼 수 있다.
localhost:8088/actuator/health 를 보면 서버 상태를 확인해볼 수 있는데,

이런식으로 UP이라고 확인해볼 수 있다.
아까 추가해준 endpoint 덕분에 더 많은 정보를 확인해볼 수 있고, 보기 좋게 커스터마이징 해서 사용하면 더욱 유익한 기능인 것 같다.
반응형
'프로그래밍 > SPRING BOOT' 카테고리의 다른 글
| [인프런 : spring-boot] Spring Security를 이용한 인증 처리 (0) | 2022.09.07 |
|---|---|
| [인프런 : spring-boot] HAL Browser를 이용한 HATEOAS 기능 구현 (0) | 2022.09.07 |
| [인프런 : spring-boot] Swagger 구현 방법 (0) | 2022.09.02 |
| [인프런 : spring-boot] Swagger 사용 (0) | 2022.09.02 |
| [인프런 : spring-boot] HATEOAS 적용 (0) | 2022.09.02 |